

29 July 2010
iTouch App: Money Book

28 July 2010
The Drawing Scale
The whole idea behind creating scale drawings it to allow the drafter to create a drawing which is proportionately the same as the artifact it represents. Using a measuring device called a scale, we can create accurate drawings of both very large objects or very small objects and fit either on a standard size piece of paper.

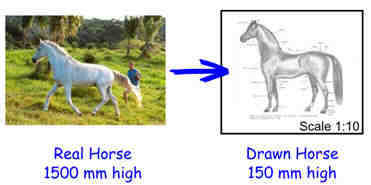
2:1
Pronounced "Two is to One"
DOUBLE SIZE :2 millimeters on paper =1 millimeter on the artifact
The drawing is twice as large as the artifact.
27 July 2010
Annoyed by an 'Annoying Orange'
You wake up in the morning, wearing a big smile on your face, then suddenly you realize you're already late for school. So, you hurry up and do stuffs as fast as you can, then you'll see yourself stuck on a heavy traffic. On your way, there's someone whom you really don't know, he approaches you, tries to tell stories, tries to be FC (feeling close), tries to be funny when actually he's not then you're irritated. Finally you'll enter the classroom and your seatmate tells you, you missed a surprise quiz, you get upset, another tells you how easy the quiz was and he got a perfect score... so you're totally pissed off!

And now, I thought of writing about 'Annoying orange'. Out of boredom, I got to watch this on YouTube, and it's really funny. By the way, annoying, in Filipino, is nakakainis, nkakairita, nakakaasar, nakakabanas or nakaka-BV (bad vibes).
 Annoying orange is a comedy web series created by Dane Boedigheimer, known as 'daneboe'. It was only January, this year that it had its own channel in YouTube and surprisingly, each episode earns more than a million views. The series is about a talking orange who tries to annoy fruits, vegetables, everything, even Santa Claus and an iPhone, every time he gets to have a chance to have a conversation with them.

 Annoying orange is a comedy web series created by Dane Boedigheimer, known as 'daneboe'. It was only January, this year that it had its own channel in YouTube and surprisingly, each episode earns more than a million views. The series is about a talking orange who tries to annoy fruits, vegetables, everything, even Santa Claus and an iPhone, every time he gets to have a chance to have a conversation with them.
26 July 2010
Management - Chapter 4 to 6
iTouch App: Today Todo Pro

This application easily manages all your tasks. No unnecessary buttons, no myriad of taps to add a simple task. A sweat-free application. Don't be fooled by Today's appearance, it looks plain simple yet it offers many features. There is also a built-in web server that allows you to manage your tasks from your computer!
25 July 2010
Jolicloud: Building the Perfect OS for Your Netbook

Jolicloud is a Linux-based operating system founded in 2008 by Tariq Krim, who is based from Paris. The cloud is built upon Debian and Ubuntu 9.10, but is tweaked for netbooks and other computers with limited disk storage, memory, and screen size. It can also run Windows-only products by using Wine.

A Simpler, Customizable Launcher Entirely Built in HTML5
- Installing an app takes only one click, and removing it is just as easy.
- Jolicloud comes with some of the best apps already pre-installed, including Gmail, Skype, Twitter, Firefox, and more.
- It’s up to you to organize your apps the way you want - your launcher is customizable.
- Because everything is in one place, it’s easy to manage your files and data, whether they’re on your machine or in the Cloud.
- Jolicloud facilitates access to popular online storage services like box.net, Dropbox, and drop.io, with new services being added frequently.
Experience the Anywhere OS
- You can install Jolicloud on as many devices as you’d like, and they will always be automatically synchronized. Any app you download, delete, or move around will be the same on all your other machines with no extra work on your part.
- You can even manage your interface from the Cloud - if you don’t have your computer with you, log in on any HTML5 browser like Chrome to add, remove, or organize apps.
- Moving from machine to machine has never been so easy
I'm personally using Jolicloud on my netbook. The installation is very easy. It's like you're just installing a software on your netbook. I also did check on removing the cloud and it's user-friendly, like installing it, you'll just have to uninstall it on the Add/Remove Programs under your Control Panel.
24 July 2010
Kinematics - Displacement (Plate #1)
After three failures on my first plate, I've finished a decent one. The first try was acceptable since I made a mistake on the first steps in drawing the figure. The problem on the second try was in terms of the scale so it's not pain in the ass. And the last one was a failure of my ruler. The ruler that I'm using that time has a different dimension, an inch in my ruler is smaller than the real "inch", and thanks to my friend because he's the one noticed the glitch on my plate but I hope he saw it earlier before I'm totally finished drawing my plate. Maybe my ruler was fake. So beware of fake rulers, it will waste your precious time.
My first drawing plate for this sem is about four-bar linkage. A four-bar linkage is the simplest movable linkage. It consists of four rigid bodies called cranks and links, each attached to two others by single joints or pivots to form a closed loop. Four-bars are simple mechanisms common in Mechanical Engineering machine design and fall under Kinematics.
I've traced the ellipse like curve and the semi-circular curve using my FRENCH CURVE. I've spent a full 5 hours in finishing this first *take note, FIRST* plate. So join me on the upcoming head-aches. Just kidding.
Seriously, I'm having a hard time on my Kinematics. And I'm expecting a lot of trouble in the near future *fingers crossed* but I'm allotting more time in studying the course. Wish me a good luck.
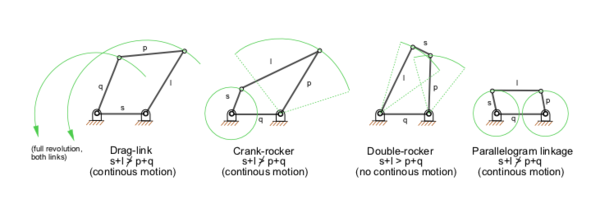 |
| Photo courtesy of wikipedia.org |
 |
| First few lines were drawn. |
 |
| Finishing the oscillating crank. |
 |
| Final plate. |
I've traced the ellipse like curve and the semi-circular curve using my FRENCH CURVE. I've spent a full 5 hours in finishing this first *take note, FIRST* plate. So join me on the upcoming head-aches. Just kidding.
Seriously, I'm having a hard time on my Kinematics. And I'm expecting a lot of trouble in the near future *fingers crossed* but I'm allotting more time in studying the course. Wish me a good luck.
23 July 2010
Economics - Elasticity of Demand and Supply
Download HERE
Quiz 2 is now over and our new lesson is available now to download. Time is passing by like the air that we breathe. Let's do good 3MEA. No one will be left behind. Spread the link to our fellow 3MEA mates. Go!
Lesson 1 to 3 HERE
Quiz 2 is now over and our new lesson is available now to download. Time is passing by like the air that we breathe. Let's do good 3MEA. No one will be left behind. Spread the link to our fellow 3MEA mates. Go!
Lesson 1 to 3 HERE
Nuffnang and HEAVEN Ice Cream invite you to a special screening of ‘SALT’

Divine ice cream pleasure is HEAVEN Ice Cream.
Give in to the richest, smoothest, and creamiest by NESTLE Ice Cream. Revel in the exquisite goodness of its four sophisticated flavors---Belgian Chocolate Bliss, Strawberry Dream, Vanilla Almond Secret and Butter Pecan Obsession. HEAVEN Ice Cream is made with only the finest ingredients and contains no artificial food colors. Available in 800mL(Php 175) & 450mL(Php 115) tubs across supermarkets, groceries, and convenience stores nationwide.
The French Curve
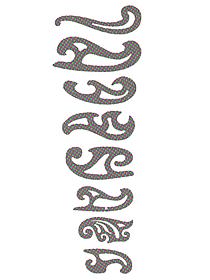 The use of french curve is to draw a smooth curve through predetermined points. So after plotting the points, a light pencil line should be sketched to connect the points in a smooth flowing curve. In able to draw the finished line over the freehand line, match the various parts of the french curve to various segments of the freehand curve.
TIPS:
1. Avoid abrupt changes in curvature by placing the short radius of the french curve toward the short radius portion of the line to be drawn.
2. Change your position around the drawing board when necessary so that you can work on the side of the french curve that is away from you.
3. You should avoid working on the "under" side of the french curve.
4. Place the french curve so that it intersects at least two points of the curve. 3 points is always recommended.
5. When drawing the curve along the edge of the french curve, stop short of the last point intersected. Then move the french curve along to intersect two or three more points.
6. Make sure that the edge of the curve connects smoothly with the part of the curve that is already drawn.
7. When drawing irregular curves, you can draw a perfectly smooth curved line by plotting enough points and by drawing in short steps.

The figure above shows how a smooth curve is draw through a series of plotted points.
- The french curve in view A matched points 1, 2, 3, and 4. Draw a curve from 1 to 3 only.
- At B, the curve matches points 3 to beyond 4. Draw a curve from 3 to 4 only.
- At C, it matches points 4, 5, and 6. Draw a curve from 4 to just short of 6.
- At D, it matches a point short of 6 to beyond 7. Draw a curve from 6 to 7.
- At E, it matches a point short of 7 to beyond 9. Draw a curve from 7 to 9.
- At F, it matches a point short of 9 to beyond 11. Draw a curve from 9 to 11.
You will probably notice how the french curve is turned over and reversed to find portions that fit the points on the line with increasing or decreasing changes in the curvature.

Here are my Rotring french curves that I use in my drawing plates. They are quite new. I've bought them Wednesday this week in order to finish a plate because I need to trace an irregular ellipse. By the way, if you wanted to learn how to draw an ellipse, click HERE.
19 July 2010
Win a Sony VAIO Before It's Too Late!

Don't forget to drop a comment if you win. Good luck!
iTouch App: Pi Cubed


18 July 2010
Economics - Lessons 1 to 3
UPDATE:
Lesson 3
HW on Supply
Lesson 3 is now available. Plus, there's a HW about Supply. So download it now.
Lesson 3
HW on Supply
Lesson 3 is now available. Plus, there's a HW about Supply. So download it now.
16 July 2010
Neurotic Anxiousness
After the last year tragic storm, Ondoy, that hit the Philippines on 26SEP09 I always had the feeling that this year a storm will make the same tragedy to us. Specially these days, that a heavy rain suddenly pours. Maybe because of my own experience that I haven't been able to go home and been stranded somewhere in Manila but fortunate enough to stay at a friend's house.

 We also passed by a Jollibee outlet that has been devastated by the flood. The mirrors of the store was shattered into pieces and all of their equipments were full of mud. There are a lot of people wandering around, checking their surrounding and looking on what the storm had done on their environment.
Here are views of the river before and after the storm. And it is clearly seen the difference made after the tragedy. Photo of Marikina River on a normal day (Top), and a photo of Marikina River after the storm Ondoy (Bottom).


I wish it won't happen again.
08 July 2010
Want a Better Facebook?
Are you using Google Chrome as your browser and visiting your Facebook account daily? Well, you will definitely say yes to these Google Extensions that will simply make your Facebook experience quite better. Just simply click "Install" after following the links below.
Let me share you the two Google Extensions that I use. First, we have Beautify Facebook. It will spice up the theme of your Facebook. Here is a picture of what it will look like after installing the Beautify Facebook extension.

Next is the Facebook Photo Zoom. It lets you see the full scale size of the picture without even clicking it. It's easy to use, just hover your arrow on the picture you wanted to zoom in and that's it. Here is a sample of the extension zooming a Christmas tree photo.

Wanted to try Google Chrome?
If you have any suggested Facebook Google Chrome extensions or any other useful extensions that you wanted to share with everyone, don't hesitate to hit the comments.
Let me share you the two Google Extensions that I use. First, we have Beautify Facebook. It will spice up the theme of your Facebook. Here is a picture of what it will look like after installing the Beautify Facebook extension.

Next is the Facebook Photo Zoom. It lets you see the full scale size of the picture without even clicking it. It's easy to use, just hover your arrow on the picture you wanted to zoom in and that's it. Here is a sample of the extension zooming a Christmas tree photo.
Wanted to try Google Chrome?
If you have any suggested Facebook Google Chrome extensions or any other useful extensions that you wanted to share with everyone, don't hesitate to hit the comments.
07 July 2010
Management - Chapters 1 to 3
Kinematics - Velocity Analysis
Velocity Analysis
Topics included in the hand-out:
1. Velocities and Acceleration of Mechanisms
a. Resolution and Composition
b. Instantaneous Axis of Velocity
c. Centro
d. Velocity Polygon or Relative Velocity
2. Short review of Vectors
3. Scales
a. Space Scale, Ks
b. Velocity Scale, Kv
c. Acceleration Scale, Ka
Our professor also gave the presentation for the course, Kinematics. Download it now.
Kinematics Presentation
Topics included in the hand-out:
1. Velocities and Acceleration of Mechanisms
a. Resolution and Composition
b. Instantaneous Axis of Velocity
c. Centro
d. Velocity Polygon or Relative Velocity
2. Short review of Vectors
3. Scales
a. Space Scale, Ks
b. Velocity Scale, Kv
c. Acceleration Scale, Ka
Our professor also gave the presentation for the course, Kinematics. Download it now.
Kinematics Presentation
06 July 2010
How to Draw an Ellipse by Four-Center Method
There are various methods in drawing an ellipse. We have the simple Pins & Strings method, the Concentric-circle method, and the Four-center method. I will share to you the Four-center method by giving the steps and a diagram so it will be easier to understand.
Steps:
 1. Draw the major axis, AB, and the minor axis, CD, which are mutually perpendicular at the midpoint, O, as shown in the diagram.
2. Draw AD, that connects the end points of the two axes.
3. Using a compass, point the tips of it to DO then plot it along AO and reset the compass on the remaining distance to O.
4. With the difference of semiaxes thus set on the dividers, mark off DE equal to AO minus DO.
5. Draw perpendicular bisector AE, and extend it to intersect the major axis at K and the minor axis at H.
 6. With the compass, mark off OM equal to OK, and OL equal to OH.
7. With H as a center and radius R1 equal to HD, draw the bottom arc.
8. With L as a center and the same radius as R1, draw the top arc.
9. With M as a center and the radius R2 equal to MB draw the end arc.
10. With K as a center and the same radius as R2, draw the other end arc.

The four circular arcs thus drawn meet, in common points of tangency, P, at the ends of their radii in their lines of centers.
If you have questions or request, feel free to leave a comment.
Steps:

2. Draw AD, that connects the end points of the two axes.
3. Using a compass, point the tips of it to DO then plot it along AO and reset the compass on the remaining distance to O.
4. With the difference of semiaxes thus set on the dividers, mark off DE equal to AO minus DO.
5. Draw perpendicular bisector AE, and extend it to intersect the major axis at K and the minor axis at H.

7. With H as a center and radius R1 equal to HD, draw the bottom arc.
8. With L as a center and the same radius as R1, draw the top arc.
9. With M as a center and the radius R2 equal to MB draw the end arc.
10. With K as a center and the same radius as R2, draw the other end arc.

The four circular arcs thus drawn meet, in common points of tangency, P, at the ends of their radii in their lines of centers.
If you have questions or request, feel free to leave a comment.
05 July 2010
Lateral Development
The development of lateral surfaces is simply the flat surface or 2D that you need to cut when you are about to make a 3D thing. If you want to make a cylinder, pyramid, or a cube for an instance a lateral development layout may firstly be required.
(Click to enlarge)
 Here is an example of a lateral development drawing of a rectangular right pyramid. The true lengths of the edges and base are measured in order to have an accurate piece. A top view and front view of the pyramid was drawn first to help in drafting the lateral development of it.
Actually lateral developments are very useful in my machine shop course. In my class, we are about to make a tool box as our first project for the semester and a layout of it should be draft first.

(Click to enlarge)
 Here is an example of a lateral development drawing of a rectangular right pyramid. The true lengths of the edges and base are measured in order to have an accurate piece. A top view and front view of the pyramid was drawn first to help in drafting the lateral development of it.
Actually lateral developments are very useful in my machine shop course. In my class, we are about to make a tool box as our first project for the semester and a layout of it should be draft first.

(Click to enlarge)
This is the draft of our group. The tool box layout is divided into five parts. The holder and the lowest piece under the lock will be attached to the cover and the upper pieces of the lock will be on the body. The connector will be used to attach the two main parts of the tool box, the cover and the body.Hailstorm in Philippines
Yes, a hailstorm in Marikina, Philippines. This is the first time I've seen small ice particles fall from the sky here. I happened to see such hailstorms, well I know it's quite peculiar, in Saudi Arabia, a country that mostly comprises deserts. That was twice on a consecutive year in the month of May.
It was 11:30am when it started raining hard. I actually even looked outside because the rainfall is much heavier than the usual. And I saw mothball like particles on the street.
I couldn't believe that hailstorm will also happen here in the Philippines. Well I hope the next thing that will fall from the sky are snows. I really wanted to experience snowing.
Subscribe to:
Posts (Atom)
